Setting Up Routes and Views
Now that we are well into this tutorial, always have the project open in both a text editor and a terminal. Also have the virtual environment activated
Writing our first View
Like I said earlier, our views are going to be responsible for a crux of the work our Django app will do, so, with that said, let's write our first one.
Our first view will be a simple home view, as this website is the Byte Club website first, and blog second.
To get us started, open up the views.py file created in the blog directory. It
should look something like this:
blog/views.py
from django.shortcuts import render
All this starter code does is it imports the commonly used render function from the
django.shortcuts module. We will be using it later, so feel free to leave it in.
Now that we have it open, we can write a simple view that returns an HTTP response.
blog/views.py
from django.shortcuts import render
from django.http import HttpResponse

# Create your views here.
def home(request):
    return HttpResponse("<h1>Hello</h1>")
First we import the HttpResponse class, which lets us return HTTP responses to the user. The
new home function takes one parameter, request. We discussed the different types of requests
earlier, and we can do different things depending on the type of request, but for now, we'll just send
back a response, which is just an HttpResponse containing some HTML.
That's our first view done. Now we need to make sure the server knows where it is. If you recall from the
diagram from earlier, it's the urls.py file's job to let the server know which view to use.
With that in mind, let's open up the urls.py file in the ByteClubBlog (which is
named django_project on Replit) directory. You should see something like this:
<project folder name>/urls.py
from django.contrib import admin
from django.urls import path

urlpatterns = [
    path('admin/', admin.site.urls),
]
This code handles the routing. When it receives a request to a specific URL, it will match it to an
appropriate view, or delegate it. We can see it actually already has one entry, the URL pattern for the admin
site. It delegates any URL path starting with "admin/" to the admin.sites.urls module, which is another
urls.py file to handle everything related to the admin site. More specifically, any URL
starting "admin/" has the "admin/" part removed, and the rest of the URL sent to the
admin.sites.urls file. We will actually be doing this exact same thing, since all of our URLs
related to the blog should be kept together. We can do this like so:
<project folder name>/urls.py
from django.contrib import admin
from django.urls import path, include

urlpatterns = [
    path('admin/', admin.site.urls),
    path('', include('blog.urls')),
]
We start by adding an entry to the urlpatterns list using the path function.
This function takes 2 parameters, the actual URL part, and the view or URLs file we want to associate it
with. In this case, we want to associate any URL paths starting with '' to our blog app's
urls.py. To do this, we'll use the include function we imported. This
function tells Django to delegate the remaining part of the URL to a separate urls.py file.
In this case, we want to use a urls.py file in our blog app, so we include 'blog.urls'.
Note: The first parameter of thepathfunction is actually what comes right after the website name. For example, the URL path of "example.com" is "" (in Python '' and "" are the same thing), since nothing comes after the name of the website. For "example.com/hello" the URL path is "hello/". Another thing to note, is that Django will look for an exact match when associating URLs to views or to otherurls.pyfiles. So while 'admin/' technically starts with '', it 100% matches the existing admin URL pattern entry.
Now that we've told Django to associate all URL paths starting with '' to our blog's urls.py, we
should probably make it. Create a new file called urls.py in the blog directory, and type this out the
following:
blog/urls.py
from django.urls import path
from . import views

urlpatterns = [
    path('', views.home, name="site-home"),
]
This urls.py works much like the other one. When it gets sent a URL pattern by the first URLs
file, it tries to match the pattern to one in the list. In this case, we have the '' pattern set up as an
entry. Anything that matches that gets referred to the view we just wrote. We do this by importing the whole
views.py file using from . import views. . is just how Python refers
to the current directory. Now that it's imported, we can use our view function by writing
views.home, which simply tells Python to use the home function from the view file. Lastly, we add
a name parameter, which will come in handy later.
And now, the result. We've written our view, and we've informed Django when to use it. So, if you start the
server, and navigate to the URL, you'll see it! That's our very first view. Here's a recap on how it works. When the
server receives a request to the '' URL path, it looks in the project-level urls.py file for
matches. The first URL pattern in the list match with URL paths that start with 'admin/'. '' doesn't match
that, so it looks for the next one. The next one matches with URL paths that start with '', which does
match the pattern. So, the server looks at the next argument to the path function, which is
include('blog.urls').
That in turn points to the urls.py in our blog app. This urls.py file
matches to everything after the first pattern that was matched. Since the first pattern that matched was '',
and there was nothing after, the pattern that matches this is once again ''! So, the server runs the
views.home function, which is actually the view function we just wrote in our views.py
file. And like that, the user receives a website in a fraction of a second.
Now that we have our first view done, let's write a second view for the page where all the blog articles will be. Remember the steps to writing views:
- Write view in
views.pyfile - Associate view with URL pattern in
urls.py
Done? Here's what I did for reference:
blog/urls.py
# --snipped for brevity--

urlpatterns = [
    path('', views.home, name='site-home'),
    path('blog/', views.blog, name='blog-home'),
]
blog/views.py
# --snip--

def blog(request):
    return HttpResponse("<h1>Byte Club Blog</h1>")
Fixing the Glaring Issue
I don't know about you guys, but I'm getting annoyed at one thing. Right now, we are writing our HTML inside
our Python code, and that's driving me nuts. And with more and more views, and more and more content in our
HTML, then our code will only get more complex and difficult to manage. Fortunately, Django has us covered
with HTML templates. These templates let us just create HTML files and have Django render them for us. By
default, Django will look for a templates directory inside each of our installed apps. Since
it's possible to have many apps inside a Django project and thus, many templates directories, we want to
make sure our blog templates are kept separate and easy to find. Django suggests we make a subdirectory in
the templates directory with the name of the specific app we want our templates to be used for. Within the
new templates directory make a directory called "blog". This is where our blog's templates will
be.
Now that we have our templates directory set up, lets go ahead and create our HTML templates. I'll provide samples, but feel free to create your own. Note: make sure that your HTML templates are in the directory we just made.
Here's what I did for the 2 templates:
blog/templates/blog/index.html
<!DOCTYPE html>
<html lang="en">
  <head>
    <title></title>
    <meta charset="UTF-8">
    <meta name="viewport" content="width=device-width, initial-scale=1">
  </head>
  <body>
    <h1>Welcome to the Byte Club Website</h1>
  </body>
</html>
blog/templates/blog/blog.html
<!DOCTYPE html>
<html lang="en">
  <head>
    <title></title>
    <meta charset="UTF-8">
    <meta name="viewport" content="width=device-width, initial-scale=1">
  </head>
  <body>
    <h1>Byte Club Blog</h1>
  </body>
</html>
Now that we've written our templates, we'll have to install our app in the Django project so that Django can use them. What do I mean when I say install our app? Well, as I mentioned before, Django lets you modularly create apps that do different things, and keep them separate. Django lets you install apps so that you can use someone else's Django app in your project with just a few extra lines of code. We also have to do this so that we can make our own apps work.
To install our blog app, first open the apps.py file in the blog app. You'll see something
like this:
blog/apps.py
from django.apps import AppConfig


class BlogConfig(AppConfig):
    default_auto_field = 'django.db.models.BigAutoField'
    name = 'blog'
This is our blog app's config. To install our app, we need to let Django know about this config.
Fortunately, this is pretty easy. Open the settings.py file in the main project directory,
and scroll down until you find "INSTALLED_APPS". Add an entry like so:
<project folder name>/settings.py
# -- snip --

INSTALLED_APPS = [
    'blog.apps.BlogConfig',
    'django.contrib.admin',
    'django.contrib.auth',
    'django.contrib.contenttypes',
    'django.contrib.sessions',
    'django.contrib.messages',
    'django.contrib.staticfiles',
]

# --snip--
REMEMBER THE COMMA AFTER THE ENTRY
By adding blog.apps.BlogConfig, we tell the server that our app's config is in the blog
directory, inside the apps.py and is the BlogConfig class. And that's all
we have to do to install our app. Which means we can finally start using our templates. Open
views.py. It should look like this:
blog/views.py
from django.shortcuts import render
from django.http import HttpResponse


def home(request):
    return HttpResponse("<h1>Hello</h1>")


def blog(request):
    return HttpResponse("<h1>Byte Club Blog</h1>")
To make our views use templates, we can use the render function that was imported by
default. This function handles all of the heavy lifting involved with rendering HTML, giving us a
shortcut to easily set up routes. We can use it like this:
blog/views.py
from django.shortcuts import render

def home(request):
    return render(request, 'blog/index.html')


def blog(request):
    return render(request, 'blog/blog.html')
As you can see, the render function takes 2 required parameters, the request that is passed into the view
function, and the location of the template. This is why it was important we make another folder
called "blog" inside of our templates directory, so that we can easily find it in our views. We
also don't need the HttpResponse class, because under the hood, render
produces one.
Now that that's done, go ahead and start the server and open the site. What you see now should be our new templates. You can verify by right-clicking and viewing the page source. This should show HTML identical to the HTML we wrote for our templates.
Actually, if all we are doing is writing static pages, then we're done! We can use CSS frameworks in the head tag to make it look prettier, and add more HTML. If you want to use CSS we've written, I'll show you how in a bit.
Using Django's Templating Features
If you recall back to the beginning of the tutorial, the way Django is able to show content for
posts is by filling out templates. Our templates right now just show the same text over and over,
so lets change that. As we know, Django uses database data to fill out the HTML templates with
the correct data. Since we haven't done anything with the database right now, let's just create some
dummy data so I can show you how templating works when we actually do have database data. Let's add
some dummy data to our views.py file right under our imports:
blog/views.py
# -- imports snipped --

blog_posts = [
    {
        'author': 'Mariano',
        'title': 'FIRST!!!',
        'content': 'I am the first post!',
        'date': 'Nov 5'
    },
    {
        'author': 'Frankie',
        'title': 'Why replacing your blood with caffeine is good',
        'content': 'Trust me bro',
        'date': 'Nov 4'
    },
    {
        'author': 'Thomas',
        'title': 'Why I only write my HTML in a green font',
        'content': 'Efficiency is key!',
        'date': 'Nov 19'
    },
]

# -- views snipped --
Now that we have this dummy data, we can use it in our view, by passing in an argument to the
render function called context. This argument lets us access any data
that we need to fill in within the template. Since our dummy data is a bunch of dummy blog posts
it only makes sense to pass it to our blog view. Let's do that now:
blog/views.py
# --snip--

def blog(request):
    context = {
        'posts': blog_posts,
    }
    return render(request, 'blog/blog.html', context)
Within our view, we create a dictionary called context, which will hold all the dummy posts
we'll be using in a key called 'posts'. We then pass it into the render function so that
we can access it within our templates. Go ahead and open up blog.html and make sure it
has the following:
blog/templates/blog/blog.html
<!DOCTYPE html>
<html lang="en">
  <head>
    <title></title>
    <meta charset="UTF-8">
    <meta name="viewport" content="width=device-width, initial-scale=1">
</head>
  <body>
    <h1>Byte Club Blog Posts:</h1>
    {% for post in posts %}
      <h1>{{ post.title }}</h1>
      <p>by {{ post.author }} on {{ post.date }}</p>
      <p>{{ post.content }}</p>
    {% endfor %}
  </body>
</html>
The code in the curly brackets ({}) is what handles the heavy lifting for templating.
{% for post in posts %} repeats the HTML inside it once for every item in our list of
dummy posts, which is accessed by the posts variable (a name we assigned in the context).
inside the for loop, we can access each individual posts data by using {{ post.attribute }}.
For instance, we can access the post title by doing {{ post.title }}, and so on. We can now
test this by running the server, and navigating to the blog route. You should see something like this:
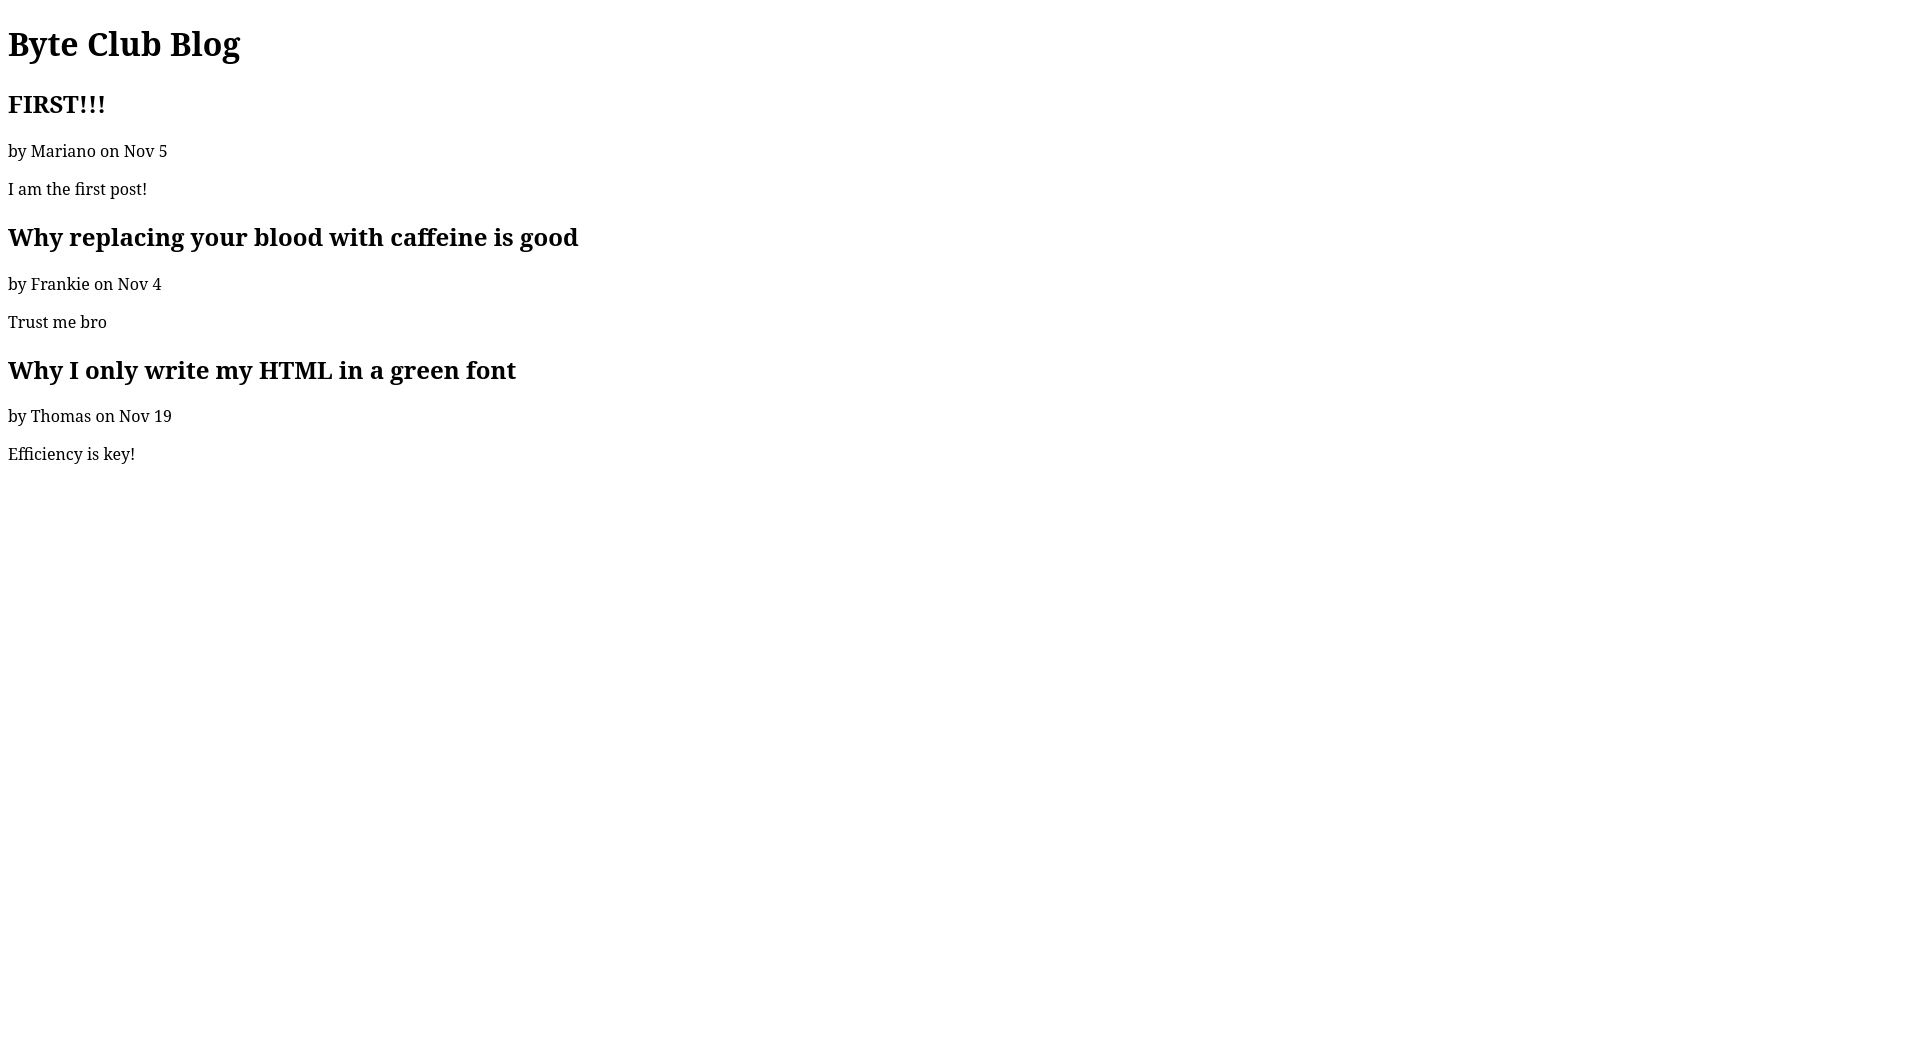
And like that, we've made our dummy blog start displaying posts! Feel free to add or change the context to see what the effects are. To recap, our view uses the dictionary items passed in the context to fill out the templates we write. On top of just loops, we can also do if-statements within our templates. Suppose we want to be able to programmatically specify what the page title should be for each view, but default to one if we don't. We can do this in both of our templates like so:
blog/templates/blog/index.html and blog/templates/blog/blog.html
<!DOCTYPE html>
<html lang="en">
  <head>
    {% if title %}
      <title>{{ title }} - Byte Club</title>
    {% else %}
      <title>Byte Club Home</title>
    {% endif %}
    <meta charset="UTF-8">
    <meta name="viewport" content="width=device-width, initial-scale=1">
  </head>
  <!-- body snipped -->
Now that you've added it to both templates, here's how it works. If there is a key called title in the context, we use it as our title, but if there isn't, then default to "Byte Club Home". We can test this by adding a title in the context of our blog view but not our home view. It should now look like this:
def blog(request):
    context = {
        'posts': posts,
        'title': 'Blog'
    }
    return render(request, 'blog/blog.html', context)
If we run the server to test this, and open both pages side by side, we'll see this:

The blog page, which we added a title to the context now uses it when being displayed, while our homepage uses our defaults.
Fixing the Repetition
While our templates work fine, the eagle eyed amongst you may have noticed something. We are repeating the
same <head> tags each time for our templates. As a matter of fact, we repeat everything
except the content of the body tag. Repeating ourselves is never good, as it increases the
amount of places we'll have to update in future changes. The Django devs also realized this, and using the
magic of templating, we can remove the repeated code. To use this magic, create a new file in the templates
directory of our blog app called base.html. Add the following:
<!DOCTYPE html>
<html lang="en">
  <head>
    {% if title %}
      <title>{{title}} - Byte Club</title>
    {% else %}
      <title>Byte Club Home</title>
    {% endif %}
    <meta charset="UTF-8">
    <meta name="viewport" content="width=device-width, initial-scale=1">
</head>
  <body>
    {% block content %}
    {% endblock %}
  </body>
</html>
As you can see, this base file contains everything shared by our templates. In the body, we create a block called content. In a Django template, a block is a section that other templates can override. Let's specify that we want to use our base template as the base for every other template. Replace your templates with the following:
index.html
{% extends "blog/base.html" %}
{% block content %}
  <h1>Welcome to the Byte Club Website</h1>
{% endblock content %}
blog.html
{% extends "blog/base.html" %}
{% block content %}
  <h1>Byte Club Blog</h1>
  {% for post in posts %}
    <h2>{{ post.title }}</h2>
    <p>by {{ post.author }} on {{ post.date }}</p>
    <p>{{ post.content }}</p>
  {% endfor %}
{% endblock content %}
We start by specifying that we want to use our base.html as a base by using
{% extends "blog/base.html" %}. Next, we create a block called content again, which will
override the block in our base template. And lastly, at the end of our HTML, we end the content block.
And now, if you run the server, you can check to see if these new changes work. If they do, nothing will
change.
One last thing I feel I should mention about Django templates, is that if you want to create links using the
a tag, you could hardcode the href to a specific URL path, or if you know where you
want the link to go, you can use Django to automatically generate the link for you. For example, suppose we
had the following a tag in a navbar to provide a link to our site home page:
<a href="/">Home</a>
To use an automatically generated link, we can change out the href for a Django templating URL
statement that references the name we gave the corresponding route in our URLs file (told you it would come
in handy!):
<a href="{% url 'site-home' %}">Home</a>
site-home is the name we gave the home view in our urls.py file. Now if we change
those URL patterns, all our links will still continue to work!
Adding some CSS
We can use external CSS by adding the required code into our base template's head. For
example, if I wanted to use the Bulma CSS framework, I would add the following line to the head:
<link rel="stylesheet" href="https://cdn.jsdelivr.net/npm/bulma@0.9.4/css/bulma.min.css">
If we want to use our own CSS, the process is slightly more involved. By default, Django looks for CSS,
JavaScript, and images in a static directory. Create a directory called static in your blog
app, and within that, create a blog folder. Like templates, Django searches for static
files in any directory called static, so to make our blog static files easily findable, we put them in a
blog directory. From there you can write your CSS file within this directory. I'll assume you call it
main.css.
Next, we need to tell Django we are using our own CSS/static files. Add this line to the top of your base HTML template:
blog/templates/blog/base.html
{% load static %}
This loads the static files, allowing us to access them. To finally use your CSS you can add the following line to the head of the base template:
blog/templates/blog/base.html
<link rel="stylesheet" href="{% static 'blog/main.css' %}">
{% static 'blog/main.css' %} generates an absolute URL to the CSS file. If you try and run
the server, it should show your new styles.
Recap
Man that was a lot to get through. But we did it, so kudos to you for sticking to it! We've learned how to write our own views, how to register them in our URLs files, how to delegate URLs to other URLs files, how Django templating works, and how to use your own CSS. Now that we have a static home page ready, it's up to you to decide how you want it look and how to design it with CSS and HTML! This website will be the online presence of the Byte Club, so be creative with how you design it. I'll provide a link to some samples for the tutorial, but if you are confident enough with how Django templating works, feel free to create your own instead, and only use the Django template logic instead of the whole sample template.
In the next lesson, we'll be looking at the Django admin page, and get started with the database so we can make actual posts instead of the dummy ones we have right now.